Homemade Beauty with Moitioure cream
Your Essential Guide to Natural Skin Care
Practical Tips on How to Make Your First Facial Cream
As I’m planning to update you with some homemade skin cream
recipes, I decided to post some general rules on how to whip up a homemade
cream. Just follow the rules, and I’m sure you will become a great cream-maker.
Background:
Creams are semi-solid emulsions, which is a mixture of oil
and water. They are categorized into two types: oil-in-water (O/W) creams
composed of small droplets of oil dispersed in a continuous aqueous phase, or
water-in-oil (W/O) creams composed of small droplets of water dispersed in a
continuous oily phase.
To make a homemade skin cream, you need three components:

Water Phase:
water, hydrosol, juice, milk, etc.
Oily Phase:
vegetable oil, animal fats, lanolin, silicones, waxes, etc.
Emulsifier:
special emulsifier for creams or wax, lanolin, lethicin, etc. The cream with a
special emulsifier is easier to make, has a better texture, and creates a more
stable emulsion so that oils do not separate from the water.
Additionally, the
cream may also contain: preservatives (which I never use in my creams), active
ingredients, extracts, essential oils, etc. In order to stabilize the emulsion
(so the cream will not break), you can use less emulsifiers and instead use gel
formers, alike xanthan, guar, or thickeners. More about beauty ingredients in
green ingredients section.
Keeping Homemade Facial Creams:
It is highly
important to make sure the product is protected from bacteria, so check that
the container is thoroughly closed.
After making a
product, immediately place it into the refrigerator.
Label the
container with the date. This will help you to remember when the product was
made so that it does not spoil.
Remove the cream
from the product container with a spatula and not your fingers. Dipping your
hands into the homemade cream will cause it to spoil faster because of the
spread of bacteria.
When you do create
a homemade facial cream, you can freeze it by placing small bottles in the
freezer. When you are ready to use it, you can simply defrost for a wonderful
beauty treat!
Advice Before Getting Started:
It is easier to
create water-in-oil (W/O) emulsion. On your first try, it is better to create
fatty creams where the amount of oil used is more than the water content.
Start with only 3
to 4 ingredients. It will be easier to understand and prevent mistakes.
It is important
not to be lazy. Wait to mix until the product has cooled completely, which you
can do with very short breaks.
Mix water and oils
of the same temperature.
Instead of
hydrosols, you can use brewed teas, chamomile, calendula, green tea, etc.
Almost all
additional components should be added at the last after the cream has cooled.
Practice Makes Perfect!
IMPORTANT: Before you begin making a homemade product, make
sure that you thoroughly clean the area that you are working in. Wash your
hands completely. Make sure to also wash any dishes, mixing utensils, spoons,
or other tools that you may use. This should be done when you begin creating
the product, as well as afterward.
So now we will make a test recipe, so you could better
understand the technique of creating homemade skin creams. I took the easiest
recipe i could imagine, so here we go. You will need:
Tools:
Container – I
always choose glass containers over plastic, because plastic containers are not
completely safe and can bring many harmful germs and bacteria to your skin.
Double boiler
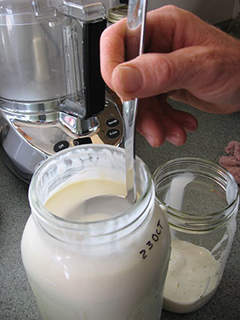
 Mini mixer – i
recently purchased great mini mixer from Amazon, you can check it here
Mini mixer – i
recently purchased great mini mixer from Amazon, you can check it here
Spoons – 1
teaspoon, 1 tablespoon
Mixing utensils –
spoons, chopsticks etc.
Instructions:
Step 1. Melt beeswax in a double boiler.
Step 2. When beeswax will melt completly add 3 tablespoons
of almond oil. Don’t forget to stir all the time
Step 3. Heat the water and add very very slowly 3
tablespoons of hot (!) water to beeswax mixed with almond oil
Step 4. Intensively mix the medley for 10 minutes and pure
it out to a prepared container
Step 5. Mix the cream with mini mixer until it cool
completely. I was mixing mine for about 20 minutes
Step 6. And here is what i’ve got
Here are some other recipes for practicing:
Homemade Face Cream For Dry Skin
3 tablespoons of cacao butter
120 ml of avocado oil
2 tablespoons of orange tea
4 drops of geranium rose essential oil
Homemade Cream For Sensitive Skin